четверг, 22 марта 2018 г.

60 Best Fireplace Mantel Ideas and Enhancing Tips

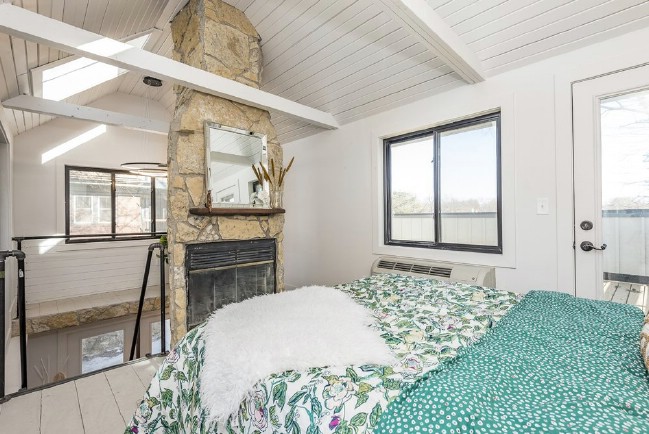
Fireplace mantels are usually the centerpiece of the spaces they stay in. Learn ways to take advantage of them with these fireplace mantel concepts. Like with any display, a mantel screen requires a particular quantity of equilibrium and also proportion. Don’t simply randomly location things. No matter what you place on it, keep these tips in mind.

  • Usage items of different sizes and shapes. Beginning with taller items at the back and use smaller sized products as you function your method onward.
  • Do not hesitate to layer items before each various other. Actually, it’s a smart idea since it creates depth. Remember, it’s not a photograph and individuals won’t constantly be taking a look at it straight-on. Things in the foreground ought to overlap those in the back.
  • If you’re a fan of symmetry, the attempted and true formula that always functions is to put one huge item between (such as a dish of flowers) and after that flank each side with matching items (develop a mirror image).
  • When making use of multiple products always utilize weird numbers. For example, 3 candle holders as opposed to two, or five bud flower holders as opposed to 4. This chooses almost every little thing in enhancing: when it involves groups, probabilities are far better than evens.
  • For an official look, support the mantel with matching items on each side.
  • Try not to use a totally random selection of products. Discover things that compliment each various other either with shade, design or motif. The things need to link to every other in some way.
  • Balance doesn’t need to mean matching. A number of light-weight things on one side could be balanced with one visually hefty item on the various other.
  • To actually produce focus and promote an item, place one large thing in the facility.
  • Don’t jam-pack! Don’t put so many items on that particular the mantel looks cluttered or crowded. Give the things taking a breath space or they’ll get shed in the mess.

A few of these fireplace mantel ideas, specifically those taking care of equilibrium and percentage can appear complex, however they’re truly not. Your eye will certainly inform you if something does not work. Just maintain experimenting up until you locate it pleasing to take a look at. The actually essential thing to bear in mind is that no display is permanent. You can always relocate points about and also have fun with the setup.

Do not know just what to put on your mantel? Here are a couple of suggestions:

  • Picture frames
  • Candlesticks
  • Statues
  • Vases
  • Clocks
  • Mint Julep mugs
  • Attractive boxes
  • Mounted prints, paintings, as well as mirrors (lean them versus the back wall for a laid-back look, after that layer smaller sized pieces before them).
  • Ornamental plates (on stands).
  • Heaps of books.
  • Darkness boxes with intriguing products installed on them.
  • Collections.
.*
TedsWoodworking Plans and Projects

Original article and pictures take http://coastalshows.com/fireplace-mantel-ideas/ site

понедельник, 19 марта 2018 г.

The Carriage House is a Unique Tiny Home from Zenith Design + Build

The vast majority of tiny houses have the same basic layout. They are similar in size and shape to a large motorhome (not a coincidence, considering motorhomes were the original tiny homes). There is one large downstairs living space, and then one or two small lofts above for sleeping, usually with very low ceilings.

I am excited whenever I see a tiny house which breaks the mold. Such is the case for the “Carriage House” by Zenith Design + Build—the same company that brought us the impressive 72 hour “Classy Amelia.”

The Carriage House is a Unique Tiny Home from Zenith Design + Build

The Carriage house doesn’t have a horizontal, low build. It actually has a vertical build, with a large attached garage.

The Carriage House is a Unique Tiny Home from Zenith Design + Build

If you count the garage, it isn’t really all that “tiny,” but the main living space certainly qualifies.

The Carriage House is a Unique Tiny Home from Zenith Design + Build

Wow … that garage holds quite a secret. The top features a huge deck surrounded by high railings. That greatly expands the livable space. It’d be a great spot for hosting parties, working on DIY projects, or just enjoying a bit of fresh air.

The Carriage House is a Unique Tiny Home from Zenith Design + Build

Seriously, the deck alone makes this one of the most exciting tiny houses I’ve seen in a long time.

The Carriage House is a Unique Tiny Home from Zenith Design + Build

Don’t you just want to lounge around on this deck with the tree boughs overhead and that expansive view all around you? I imagine in the spring and summer you might get some shade from the leaves.

The Carriage House is a Unique Tiny Home from Zenith Design + Build

An upstairs door leads directly into the home.

The Carriage House is a Unique Tiny Home from Zenith Design + Build

Here is the downstairs door, decorated with the same trim found on the upstairs door. I am really digging the color scheme. The muted blue and the warm brown contrast with each other, but do not clash in any way. They make great complements.

The Carriage House is a Unique Tiny Home from Zenith Design + Build

The front doors are really wide! When they are open, you can get a great perspective of the layout of the home just at a glance. The doors open right on the kitchen, with the bathroom in the back. A set of metal stairs leads up to the bedroom, which adjoins to the deck.

In many respects, it really is not all that different from your standard tiny house layout—just more vertical.

The Carriage House is a Unique Tiny Home from Zenith Design + Build

If you were to step inside the kitchen and close the front doors and look back at them, this is the view you would see.

The Carriage House is a Unique Tiny Home from Zenith Design + Build

Here is a glimpse of the bathroom.

The Carriage House is a Unique Tiny Home from Zenith Design + Build

Here you can see the fridge and freezer, which have been set back into an alcove in the wall. Next to that is a little extra cabinet and counter space. White cabinets blend right into the wall overhead.

The Carriage House is a Unique Tiny Home from Zenith Design + Build

Across from that is the rest of the kitchen. On the far right is the oven and cooktop. I’m not sure what that appliance is to the left of that (it looks like a second oven, but that doesn’t seem likely). Left of that is the sink and some cabinet space, with more cabinets overhead, plus a microwave. The white paint on the cabinets again makes them blend in with the walls, so the space appears as open as possible. Let’s head upstairs!

The Carriage House is a Unique Tiny Home from Zenith Design + Build

Now we’re in the bedroom. This is one of my favorite parts of the house—right here next to this railing. This section of the floor could’ve been closed off—and that wouldn’t have been a bad thing. But leaving it open like this means that you can look all the way up to the ceiling of the bedroom from the ground floor. This gives the entire home a more expansive feel.

Plus, there is still plenty of floor space in the bedroom, and there’s this cool little walkway here! The bedroom also still has plenty of privacy.

The Carriage House is a Unique Tiny Home from Zenith Design + Build

That stone structure is a fireplace. With its central location, it would focus heat in the bedroom, but it would be able to reach the ground floor as well.

The Carriage House is a Unique Tiny Home from Zenith Design + Build

The bedroom has the same spacious, airy feeling as the rest of the house. It’s rare to see a bedroom with a high, vaulted ceiling in a tiny house, but here you have one! It’d be amazing having the deck so accessible right there next to the bed too. If you wanted to step outside for a breath of fresh air in the night and look at the stars, it’d be as easy as walking two steps.

The Carriage House is a Unique Tiny Home from Zenith Design + Build

Not sure if this is a sculpture or a light fixture, but it’s cool either way.

Want to learn more about the Carriage House and Zenith’s other tiny house builds? Visit their official website.

Original article and pictures take https://www.itinyhouses.com/tiny-homes/the-carriage-house-is-a-unique-tiny-home-from-zenith-design-build/ site

среда, 7 марта 2018 г.

L A D Y B O S S on Instagram: “Boa noite com essa LINDEZA! ✨💕 Temos váaarios modelos de luzinhas como essas da foto! Lembrando que é tudo em até 3x sem juros -…”

Woodworkers with a passion for making wooden construction toys will love these chunky model toys.

Designed and built to last, these wooden toys make the perfect "made with love" gift for children.

Wooden Construction Toys Plans
Cick to Enlarge

Make this delightful toy grader with this free plan, complete with step by step instructions, diagrams and photos.

There is just enough detail to stimulate the imagination of children and adults alike.

Tools

This construction toy can be made with just a few tools.

A cordless drill is a tool that I use most often and as a bonus, it also useful for driving screws for carpentry work.

Shop for cordless drill on eBay

You may also need the following items to complete the project:

  • Hacksaw to cut the dowel axles to length.
  • Wood file to round over all the edges.
  • Sanding block with 120 and 80 grit sandpaper.
  • A selection of drill bits.

A 12 inch disc sander or linisher with sanding disk attachment is very useful for trimming up end grain and squaring off small pieces of wood.

If you are going to make your own wheels for this wooden construction toy, a drill press is recommended. You will also need a 16mm spade bit, a 6mm drill bit and a circle cutter modified to cut wheels instead of holes.

Materials

This wooden construction toy can be made with bits of wood left over from other projects.

I made mine from a piece of left over pine 19mm thick by 140mm wide by 500mm long. The wheels were also cut out of 19mm pine by 140mm wide.

For the six wheels, I used a piece less than 200mm in length, and the extra length was useful in clamping the piece while using the circle cutter.

The blade of the grader was made with a piece of skirting board 200mm long.

For the axles, use 6mm dowel.

Step by Step Instructions

Download a print ready PDF copy of the construction toy plans.

  • Step 1. The first step is to read through the instructions and study the plans and photos.
  • Step 2. Using a soft pencil and a ruler, mark out the component parts as shown in the drawing.
  • Cut out the parts using an electric jigsaw, a backsaw or a scroll saw.
  • Parts A to D are trimmed back to their proper sizes. A twelve inch disc sander is useful for trimming small pieces.
  • Glue the pieces that make up parts E and F and put to one side to set.
  • Clamp parts B together and drill the holes for the axles. At this stage, the holes are drilled for a snug fit. Do this in order to make sure things stay lined up when the parts are glued and clamped together.
  • Dry clamp parts A and B together, keeping the two parts B aligned with the axle dowels. Mark the pieces so that it will be re-assembled in the correct order. It is shown in red in the photo only to highlight the idea, so don't actually mark it in red. Apply the glue, clamp it and put to one side.

    It is important that the axle dowels are left in place until the glue sets to minimize creep under clamping pressure. Once the glue has set, re-drill the holes to allow the axles to spin freely.

    The blade of the grader, part C, is made from a piece of skirting board cut to a width of 30mm. It may also be made from a piece of timber that is 9mm thick, just chamfer one edge to the profile shown in the drawing.

    Cut and trim part D to size, and drill the axle hole using a drill press or drill guide. Use the 6.5mm drill bit to allow the axle to spin freely.

    Drill the holes for the roof of the cab by placing it on the body as shown in the photo.

    The photo shows how to fix the dowels on place by measuring the height the dowels are set so that they sit slightly above the roof. This is an idea borrowed from the Craftsman furniture movement.

    Final Assembly

    Glue the roof and engine block in place. Once the glue has set, lightly sand the whole toy with 220 grit sandpaper, removing all the sharp corners.

    Attach the wheels with a small dab of glue.

    Painting and Finishing

    Leave it in it's natural state, or apply your favourite finish. I used yellow food colouring for a bright yellow finish. To make the wheels black, I mixed all the food colours together.

    For information on food safe finishes and dyes, visit U-Beaut.com.au includes links to international suppliers.

    More Wooden Construction Toys

    wooden construction toys
    Toy Steam Roller Mk1 & Mk2

    Construction toy plans easy build steam roller.

    Price: Free

    wooden construction toys
    Large Road Grader

    Large toy road grader, about 20% bigger than the original version of the road grader.

    Price: Free

    Construction Vehicle Toy Plans
    Dam Scraper
    Construction Vehicle Toy Plans
    Mobile Crane
    Construction Vehicle Toys
    Bulldozer
    Construction vehicle toy plans
    Steam Shovel

    More free wooden toy plans includes tipper trucks, airplanes, cars even a batmobile.

    Visit the woodworking projects gallery to view projects from people all around the world.

    Original article and pictures take https://www.wooden-toy-plans.com/wooden_construction_toys.html site

    четверг, 1 марта 2018 г.

    Wine Cellar Design Guide

    Scenario 1 of 6 (square)

    Project Name: Cameron Cellar
    Bottle Count: 896 bottles

    This is a common 'horseshoe' layout that makes good use of the room. This design features our elegant Wine Cellar Arch with LED lighting along with a Solid Diamond Cube tasting table base.

    The cellar racking racking is tied together using our curved corner units and Crown and Floor molding.

    Scenario 2 of 6 (rectangle)

    Project Name: Golden Cellar
    Bottle Count: 1,260 bottles

    This is the second most common room shape we see. There are lots of fun design options for most rectangle-shaped cellars. This cellar features a mixture of wine case, display rows, & bottle storage.

    Scenario 3 of 6 (closet cellar)

    Project Name: Decker Cellar
    Bottle Count: 448 bottles

    You'll be amazed how easy it is to get your cellar going, even in a small space like this.

    This cellar utilizes hard (voided) corners as opposed to using curved corner units, this will allow you to increase your bottle capacity in a small room. This rack also features a mixture of wine storage cubes, and a 7 bottle cubby.

    Scenario 4 of 6 (under stairs)

    Project Name: Crane Cellar
    Bottle Count: 300 bottles

    This design used our waterfall rack to maximize the use of space underneath a stairway.

    Features a mixture of waterfall racking, display row racking, and crown molding.

    Scenario 5 of 6 ("L" shaped)

    Project Name: Carmer Cellar
    Bottle Count: 1,186 bottles

    Here is a design that stores regular bottles, cases, & magnums in a label-forward, and standard display.

    Features our arched stemware rack above a Solid Diamond Cube tasting table, display row racking, rectangular case bin and quarter round shelf

    Scenario 6 of 6 (odd shaped)

    Project Name: Ciffolillo Cellar
    Bottle Count: 1,236 bottles

    Our modular racking will fill most spaces, even tricky ones like this.

    This unique half octagonal design features a mixture of custom and modular kit racking, finished with our crown and floor molding, as well as a double-deep tasting table with butcher's block top, and case storage.

    Original article and pictures take http://www.wineracksamerica.com/Wine_Cellar_Design/sample_designs.php site

    среда, 21 февраля 2018 г.

    How to Build a Storage Ottoman

    How to Build an Upholstered Storage Ottoman
    Photo by Laura Moss

    The ottoman has had a long history of multifunctionality. It served as extra seating in early American households that had tight quarters and tighter budgets. Today, versions with under-lid storage, like the handsome example at right, push the utility ever further. It's the perfect place to stash blankets or store books, and the geometric design of the upholstery makes a bold statement.

    If you're thinking of buying one, look for lids that either lift off or have safety hinges. If you'd rather have the satisfaction and creative control of building your own piece, your primary materials will be birch plywood, 2-inch-thick high-density foam, and—the most variable expense—a fabric of your liking. Customize the upholstery to fit your household decor or needs: stain resistant for pets and children, or suede for a lusher feel. And vary the height and style of the off-the-rack legs to complement existing furniture. Whether you build or buy, kick up your feet and enjoy your new focal point.

    Original article and pictures take http://www.thisoldhouse.com/toh/how-to/overview/0,,20616419,00.html site

    суббота, 17 февраля 2018 г.